The Right Way to Fix Holes in Modern Drywall
Repairing drywall usually begins by cutting the damaged area into a clean square or rectangle. Removing the damaged section allows a new patch to fit securely while keeping the surrounding material strong enough to support the repair.
What Causes Cracks in Plaster Walls?
Cracks in plaster walls are common in older homes and often develop because of structural movement or seasonal humidity changes. In climates like Pennsylvania’s, wooden framing expands during humid summers and contracts during dry winters. Because plaster is rigid, these natural changes can lead to small fractures forming on the surface.
Even minor shifts in a building’s structure can place stress on areas where walls meet ceilings, windows, or door frames, which is why cracks often appear in those locations first. Hairline cracks typically affect only the surface and can often be corrected with a thin skim coat of compound. Wider cracks that reopen over time may require reinforcement before refinishing, often using mesh tape to stabilize the area.
Step 1: Install a backing support
A sturdy backing board (usually wood) is placed behind the hole and secured inside the wall. This creates a solid surface so the new drywall patch can be screwed in tightly and stay flush with the existing wall.
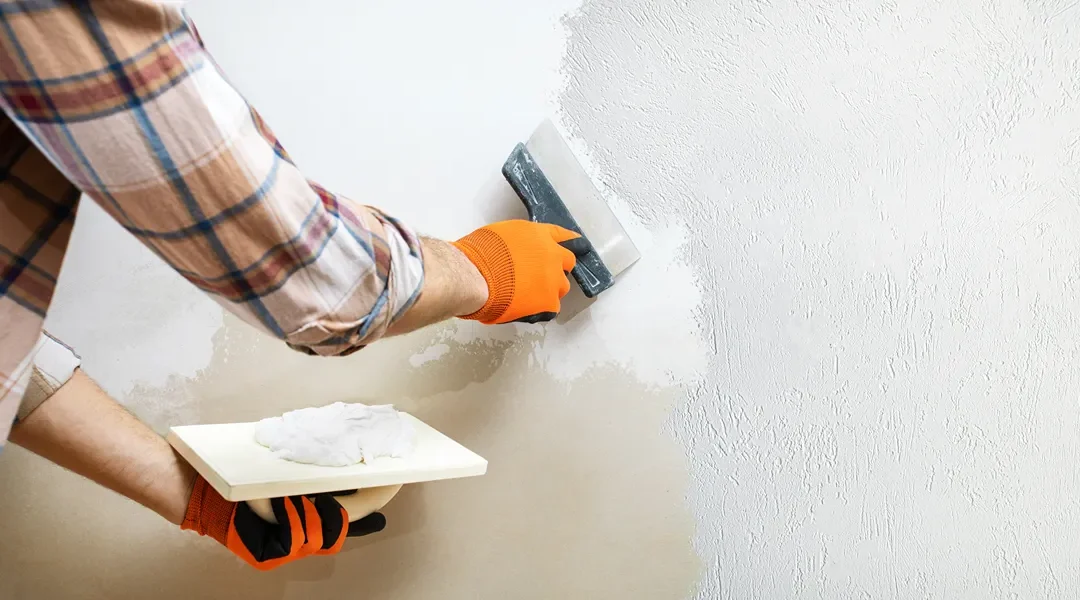
Step 2: Cut and secure the drywall patch
A replacement piece is cut to fit the opening precisely. It is then screwed into the backing board, ensuring the patch sits level with the surrounding surface to prevent uneven finishing later.
Apply tape and joint compound
Reinforcing mesh or paper tape is placed over the seams to prevent future cracking. Joint compound (also called mud) is applied over the tape to seal the edges and begin blending the patch into the wall.
Step 3: Build up thin layers gradually
Instead of using one thick coat, multiple thin layers of compound are applied. This improves durability, reduces shrinkage, and helps create a smoother, more professional finish.
Step 4: Sand between each coat
After each layer dries, it is lightly sanded to remove imperfections and create an even surface. This step is key to achieving a seamless repair.
Step 5: Feather the edges for a smooth blend
The compound is spread outward beyond the patch in wider, thinner layers—a technique called feathering. This helps the repair blend naturally with the surrounding wall so the patch becomes nearly invisible after painting.
Ensure Proper Preparation for Oil-Based Woodwork
Many older Harrisburg homes feature original wood trim finished with oil-based paint. If you apply modern latex paint directly over these glossy surfaces, the paint will not bond. It will eventually bubble, peel, or scratch off with very little pressure.
To fix this, the glossy finish must be “de-glossed” through light sanding. This creates a texture that allows new coatings to grip the surface. Applying a high-quality bonding primer is the next step to ensure the final layer of paint stays permanent.
Distinguishing Between Crazing and Wall Failure
Not every crack in plaster means something serious is wrong. Many older plaster walls develop crazing, which is a network of fine, shallow cracks that form naturally as the material ages. These cracks usually affect only the surface layer and are more cosmetic than structural.
More serious issues arise when the plaster begins to separate from the lath behind it. When this happens, the wall may feel soft, hollow, or slightly move when you press on it. This is a sign that the plaster “keys” holding it in place have broken down over time, causing sections to loosen. To fix this:
- Stabilize the Loose Plaster First: Any movement or separation must be addressed before surface repairs, or cracks will return.
- Secure Plaster to the Framing: Screws and plaster washers are used to pull the loose plaster tightly back against the lath and wall structure.
- Reinforce Weak Areas: Washers help distribute pressure evenly, preventing further cracking or breakage during the repair.
- Cover and Blend the Surface: Once secured, the washers are covered with joint compound, then smoothed and refinished to match the surrounding wall.
Can You Use Drywall Mud on Historic Plaster?
Joint compound works well for small cosmetic repairs on plaster walls, but larger repairs often require stronger materials. Traditional plaster hardens through a chemical reaction that produces a dense surface, while drywall mud dries through evaporation and remains somewhat softer.
Because of this difference, thick patches made with regular joint compound may shrink or crack over time. For deeper repairs, professionals often use setting compounds known as hot mud, which cure chemically and shrink very little.
Replaced Instead of Repaired
If large sections of plaster are sagging, crumbling, or affected by moisture, repairing each damaged area individually may not provide a reliable long-term solution.
One approach involves installing thin drywall over the existing plaster to create a smooth new surface while leaving the original wall structure in place. If the plaster has deteriorated significantly, it may need to be removed completely before new drywall is installed.
Dust Control and Safety Standards
Sanding drywall or plaster produces extremely fine dust that can travel throughout a home. This dust may irritate the lungs and accumulate in ventilation systems if not controlled.
Homes built before 1978 may also contain lead-based paint, making dust containment particularly important during repairs. Professional painters often use HEPA-filtered vacuum sanders and plastic containment barriers to capture dust and prevent it from spreading.
Recommended Curing Times for New Plaster
Depending on temperature and humidity levels, this process may take several weeks. However, painting too soon can lead to adhesion issues because fresh plaster remains alkaline and may react with paint. Modern setting compounds dry much faster and may be ready for primer within a day, though environmental conditions can still influence drying time.
FAQ
1. How can you tell if paint is oil-based?
Rub a small spot with a cotton ball soaked in rubbing alcohol. If the paint comes off, it is latex. If it does not, it is likely oil-based and needs special preparation.
2. Is it better to patch plaster or replace it with drywall?
If the plaster is still mostly attached to the lath, it is better to repair it. Plaster provides better soundproofing and insulation than standard drywall.
3. Why do cracks keep appearing in the same spot?
This is usually caused by structural movement. If the crack isn’t reinforced with tape or if the underlying frame is moving, the plaster will continue to break in that specific location.
4. How long does it take for wall repairs to dry?
Depending on the humidity in Pennsylvania, thin layers of compound dry in a few hours. Deeper repairs or traditional plaster can take 24 to 48 hours to cure fully before they are ready for primer.
From stabilizing historic plaster to seamless drywall patching, our team prepares your Harrisburg PA, home for a flawless finish. We, at Grates Pro Painting, provide you with expert drywall and plaster restoration to help West Chester homes look their best. We handle the mess and the technical details so you can enjoy a perfectly smooth interior. Request a free quote from our experts today!